Queen's Domain Combat Guide: How Stamina, Weapon Skills & Status Effects Work
Quick Answer
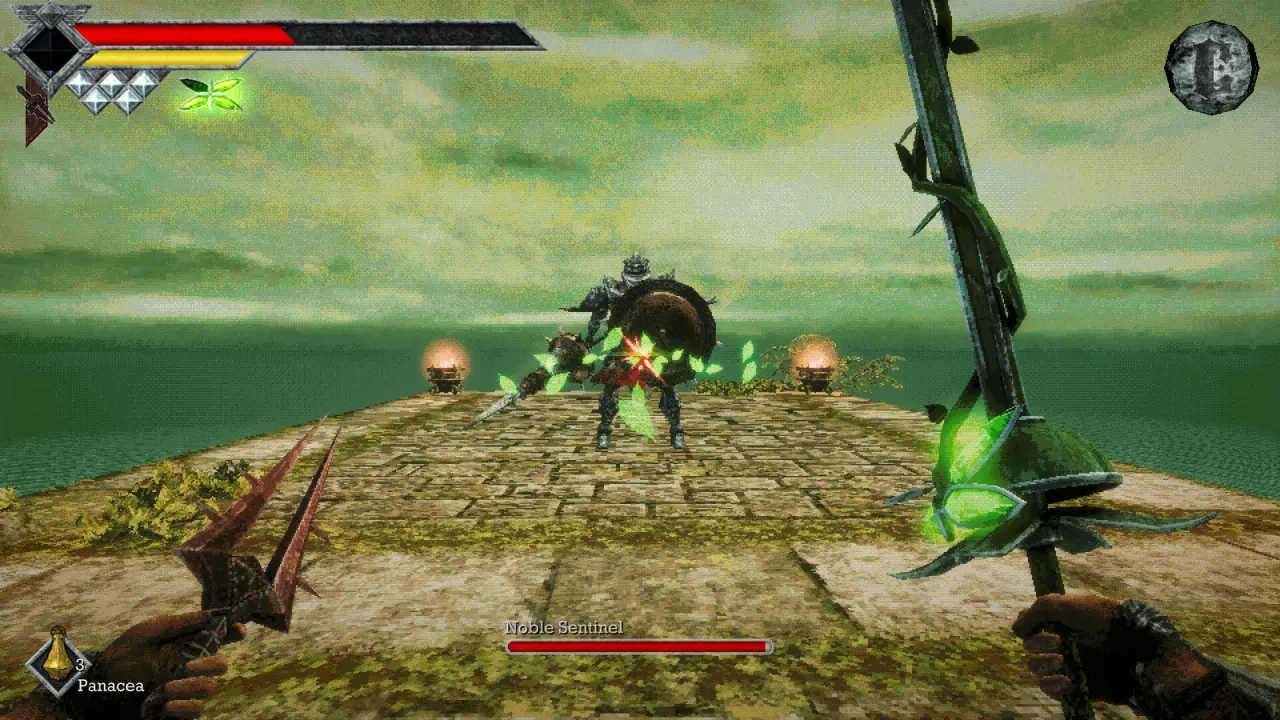
Queen's Domain combat runs on a stamina-style Power Meter: weapons only deal full damage when the yellow bar is full, one swing empties it, and spamming attacks does almost nothing. The intended loop is bait an attack → step back while the meter refills → land one charged hit → repeat, with cooldown-based throwing weapons filling the gaps. There is no dodge roll and no invincibility — positioning, damage-type matching, and status-effect management decide fights.
Combat in Queen's Domain looks like a simple first-person swing at first, and the game barely explains it. The pause-menu guidebook records the basics, but the details below — exactly how the meter works, what each button does, and what the status effects on your screen mean — are what turn fights from grueling into controlled. New players should also read the beginner guide first; this page assumes you know how saving and the bestiary work.
The Power Meter: The Bar That Decides Everything
The yellow bar under your health is called the Power Meter (reviews variously call it stamina or a power bar). Its rules:
- Full meter = full damage. Empty meter = nearly zero damage. A single swing empties the bar, so consecutive swings get progressively weaker.
- Running drains the meter. You can keep running at zero, but it won't recharge until you stop moving.
- Wind Dashes and weapon skills also drain it.
- Draining it completely does not stop your movement — you're never stun-locked by exhaustion, you just hit like a wet noodle until it refills.
That last point is the one players misread: the meter is a damage gate, not a movement gate. The standard rhythm against any new enemy is to bait its attack, retreat while the bar refills, then punish during its recovery animation. One clean hit per cycle beats five panicked ones.
Charge Attacks
Hold the primary attack button and the Power Meter fills with blue; release when it's full blue for a charged strike that adds a significant damage bonus. Details worth knowing:
- You can start charging while the meter is still recharging — you don't need to wait for yellow to begin charging blue.
- While holding a charge you cannot run, Wind Dash, or throw weapons. Only charge when you have room to finish the swing safely.
- Charged attacks are the efficient way to break crates, barricades, and other destructibles — spamming light attacks at a wooden crate takes hundreds of hits where a few charged ones finish it.
Weapon Special Attacks
Every melee weapon has a secondary attack (right-click on PC, left trigger on controller) that is weapon-specific, and this is where the combat system actually gets expressive:
- Movement-type specials: the starting sword's lunging dash (it follows your aim, not your movement keys — this feels wrong until it clicks), the spear's backward-dash stab for retreating, the Cestus uppercut that works as a mild double-jump.
- Charged magic specials: many weapons fill a meter as you deal damage, then release a spell — Puwema's Blessed Orb heals you, Blood Moon casts a ranged life-steal, Wodaso's Holy Lightning clears groups with an area blast, Sipeha's Void Maul sticks void orbs to enemies.
- Projectile specials: the Occult Warhammer and Occult Spear build throwable-projectile charges; the Machine Hammer and Plasma Spear spend Energy Cells; the Azure Torch stores two recharging fireballs.
- The Spiked Buckler's special is a parry — it reduces incoming damage and opens an immediate counterattack window, one of the few defensive tools in the game.
Evolved starter-line weapons convert their special into a magic attack at Level 10, which is a large part of why evolutions are worth chasing — see the best weapons guide for which lines pay off.
Damage Types and Enemy Resistances
Melee damage comes in three physical types — Slash, Pierce, and Impact — plus elemental types like Poison, Azure Flame, and Paralyze on special weapons. Every enemy has weaknesses and resistances, so a "strong" weapon can feel useless against the wrong target:
| Damage type | Works well against | Example weapons |
|---|---|---|
| Slash | Rodent- and insect-type enemies (Ratty Bugs, Meganeura) | Swords, Holy Sword Endu |
| Pierce | Hard-shelled and birdlike enemies | Spears, Piercing Needle |
| Impact | Skeletons and bone enemies | Clubs, Morning Stars, hammers |
After your first kill of any species, its bestiary entry unlocks exact resistances and loot drops. You carry three melee weapons at once precisely so you can swap mid-fight to cover the type an enemy is weak to.
Throwing Weapon Tactics
Throwing weapons are the third pillar of combat and the least explained. Key rules:
- They run on cooldowns, not ammunition — the Dagger Belt's daggers regenerate on a timer and extra throwing weapons add to your options.
- They cost no stamina, so they deal damage during exactly the window the Power Meter needs to refill.
- Their damage still scales with your current Power Meter, so even throws hit harder from a full bar.
- They can hit switches and targets — the Crypt's diamond-shaped door opens to a thrown dagger.
Tactically, that makes throwing weapons your pulling tool, your interrupt tool, and your DPS filler in one: aggro a single enemy out of a group, break a charging hazard before it fires, and keep pressure on while you back away. The best weapons guide ranks the throwing options; the Occult Knife (homing) and Poisoned Dirk (poison) are the usual mid-game upgrades over basic daggers.
Status Effects: Poison, Disease, and the Other Seven
Queen's Domain has nine negative status effects, listed in the in-game guide menu and marked by full-screen visual indicators. Most resolve on their own over time; dedicated cure items exist and are harder to replace than healing herbs — don't burn them on effects you can simply wait out. Resting at a Crystal Monument removes all debuffs (at the cost of respawning enemies).
| Status effect | What it does | On-screen indicator |
|---|---|---|
| Poison | Life points drain slowly over time | Purple mist at the top of the screen |
| Disease | Reduces the damage you deal | Black cloud / tunnel vision |
| Heavy | Slower movement, slower Power Meter regeneration | Falling white "rain" lines |
| Weaken | Increases damage taken | Red drops falling |
| Sticky | Prevents throwing weapon use | Spiderweb over the screen |
| Binding | Prevents magic — including magical weapon specials like the Azure Torch's fireball | Glowing green chains |
| Paralysis | Prevents all movement and attacks | — |
| Azure Flame | Life points drain while you burn | Blue flames |
| Magic Rot | Builds up slowly, then drains life quickly | — |
Two of these dominate the early game. Poison commonly comes from Chilopoda centipedes and similar enemies, and it lasts long enough to drain a fully healed character to half health or worse if untreated — carry a cure or plan a rest. Disease is quieter and nastier: your damage quietly drops, which players often misread as their weapon being weak or the meter not being full. If hits feel weak and the meter is full, check your status screen for the black cloud.
Several weapons flip status effects onto enemies: the Poisoned Dirk and Melting Moon apply poison, the Paralytic Needle and Wodaso's Power Cube paralyze or stun, and the Azure Torch burns. Binding is worth special mention — against enemies that cast it, your magic-special weapons go dark, so keep one plain physical option equipped in those areas.
Boss Fight Fundamentals
Bosses in Queen's Domain have phases and readable patterns, and levels alone won't let you skip learning them. The fundamentals:
- No dodge roll exists. The Endu Wind Dash repositions you but grants no invincibility frames. Avoidance is positioning and timing.
- Read, then punish. Bosses telegraph with long wind-ups; the reward window is their recovery animation. One charged hit per opening, then back out.
- Mind the arena. Fights like the giant skeleton sentinel take away your backpedal space, forcing you to circle instead. Fight where you have room, not where the boss wants you.
- Resist the greed swing. A greedy extra hit at the end of a fight is a classic way to die and lose the run back to your last save.
- Come back overleveled if needed. Weapon levels, character levels, and food buffs stack — the leveling guide covers how to push them before a wall.
Boss-specific patterns and strategies are on the bosses guide pages.
Frequently Asked Questions
How does combat work in Queen's Domain?
Attacks only deal full damage when your yellow Power Meter is full; each swing empties it. The core loop is baiting an enemy's attack, retreating while the meter refills, landing one (ideally charged) hit, and repeating — supported by cooldown-based throwing weapons and weapon-specific special attacks.
Is there a dodge roll or block in Queen's Domain?
No dodge roll and no standard block. The Holy Sword Endu's Wind Dash repositions you without invincibility, and the Spiked Buckler's special is a damage-reducing parry — spacing and timing are the real defense.
How do you cure poison in Queen's Domain?
Poison drains health over time (purple mist on screen) and eventually resolves by itself, but it can last long enough to be lethal. Use a poison cure item, or rest at a Crystal Monument to remove all debuffs at once — accepting that resting respawns the area's enemies.
What does disease do in Queen's Domain?
Disease (black cloud indicator) reduces the damage you deal. It fades over time; cure items and resting at a Crystal Monument clear it immediately. If your attacks suddenly feel weak with a full Power Meter, check your status screen.
Do throwing weapons use ammo?
No. Throwing weapons run on cooldown timers — the Throwing Dagger regenerates on its own, and additional throwing weapon types add further cooldown-based options. They cost no stamina, though their damage still scales with your Power Meter.
What is the blue part of the stamina bar?
The blue fill appears while holding the attack button to charge: when the bar fills blue, releasing the attack deals a charged strike with a significant damage bonus.
Sources
- Steam store pagestore.steampowered.com
- Queen's Domain Guide | Beginner Tips and Tricks — TechRaptortechraptor.net
- All Status Effects in Queen’s Domain explained — Destructoiddestructoid.com
- Queen's Domain Review — NoobFeednoobfeed.com
- Queen's Domain Review — Apocanowapocanow.com
- Queen’s Domain Review: Pure Unforgiving Action RPG Magic — Gert Lush Gaminggertlushgaming.co.uk
- So Many Games — Queens Domain reviewsomanygames.co.uk
- Tabletop Battles Reviews: Queen's Domaintabletopbattles.com
- Queen's Domain Bestiary | Monster Loot Drops — TechRaptortechraptor.net
- Queen’s Domain Releases Today! Some Beginner’s Pro Tips — Xbox Wirenews.xbox.com
Related Guides
- Leveling Guidehow character levels, stats, and food buffs feed your combat power
- Best Weaponswhich weapons and evolutions have the strongest specials
- Bossesindividual boss patterns and strategies
- Beginner Guidesaving, navigation, and the other basics this page assumes
- Bestiaryenemy weaknesses and resistances by species